اردو خطاطی ورکشاپ
The Complete Guide to Urdu Handwriting — Free Nastaliq Practice Sheets & Techniques
Why Urdu Handwriting Still Matters in the Digital Age
In an era dominated by online Urdu typing tools, phonetic keyboards, and Nastaliq text generators, it is natural to wonder whether learning to write Urdu by hand is still relevant. The answer is a resounding yes — and the reasons go far deeper than tradition.
Urdu handwriting, particularly in the classical Nastaliq script, is not merely a communication skill. It is a form of cognitive training, a cultural heritage, and — for millions of students, teachers, and calligraphy enthusiasts worldwide — a deeply personal art form. Research in cognitive science consistently shows that learning to write by hand strengthens memory retention, enhances fine motor skills, and builds a deeper neural connection to language structure than typing ever can.
For students learning the Urdu alphabet for the first time, for children working through a Qaida, and for adults seeking to improve their Urdu writing style, the journey begins with one thing: structured, high-quality practice. That is precisely what this guide — and the professional Nastaliq Calligraphy Workshop practice sheets available on this page — is designed to provide.
What Is Nastaliq Calligraphy? — نستعلیق کیا ہے؟
Urdu is written in Nastaliq (نستعلیق) — a flowing, diagonal style of Arabic-Persianate calligraphy considered one of the most beautiful writing systems in the world. Unlike the more upright Naskh script used in Arabic typography, Nastaliq is characterised by its distinctive rightward lean, its fluid letterforms, and the elegant way words cascade diagonally across the page.
Nastaliq has been the standard writing system for Urdu for over 500 years. From the royal courts of the Mughal Empire to the poetry of Mirza Ghalib and Allama Iqbal, this script carries the full weight of the Urdu literary tradition. Learning to write it correctly is not simply a matter of copying shapes — it requires understanding the underlying geometry, the directionality of strokes, and the proportional system that governs every letter.
نستعلیق صرف ایک خط نہیں — یہ ایک مکمل فن ہے جس میں ہر حرف کی اپنی جیومیٹری اور تناسب ہے۔
The Qat System (قط) — اپنے قلم کا پیمانہ
The single most important concept in professional Nastaliq calligraphy — and the one almost entirely absent from beginner resources — is the Qat (قط).
In traditional calligraphy, a Qat refers to the width of the reed pen's nib. Every single measurement in classical Urdu calligraphy is expressed as a multiple of the Qat. It is the universal, self-scaling unit of measurement that makes classical calligraphy both precise and infinitely flexible.
QAT (قط) = 1 Unit = Your Pen's Nib Width
Both are correct. Whatever pen you use, its nib width is your 1 Qat/Unit. The letter proportions always stay the same — only the physical size changes.
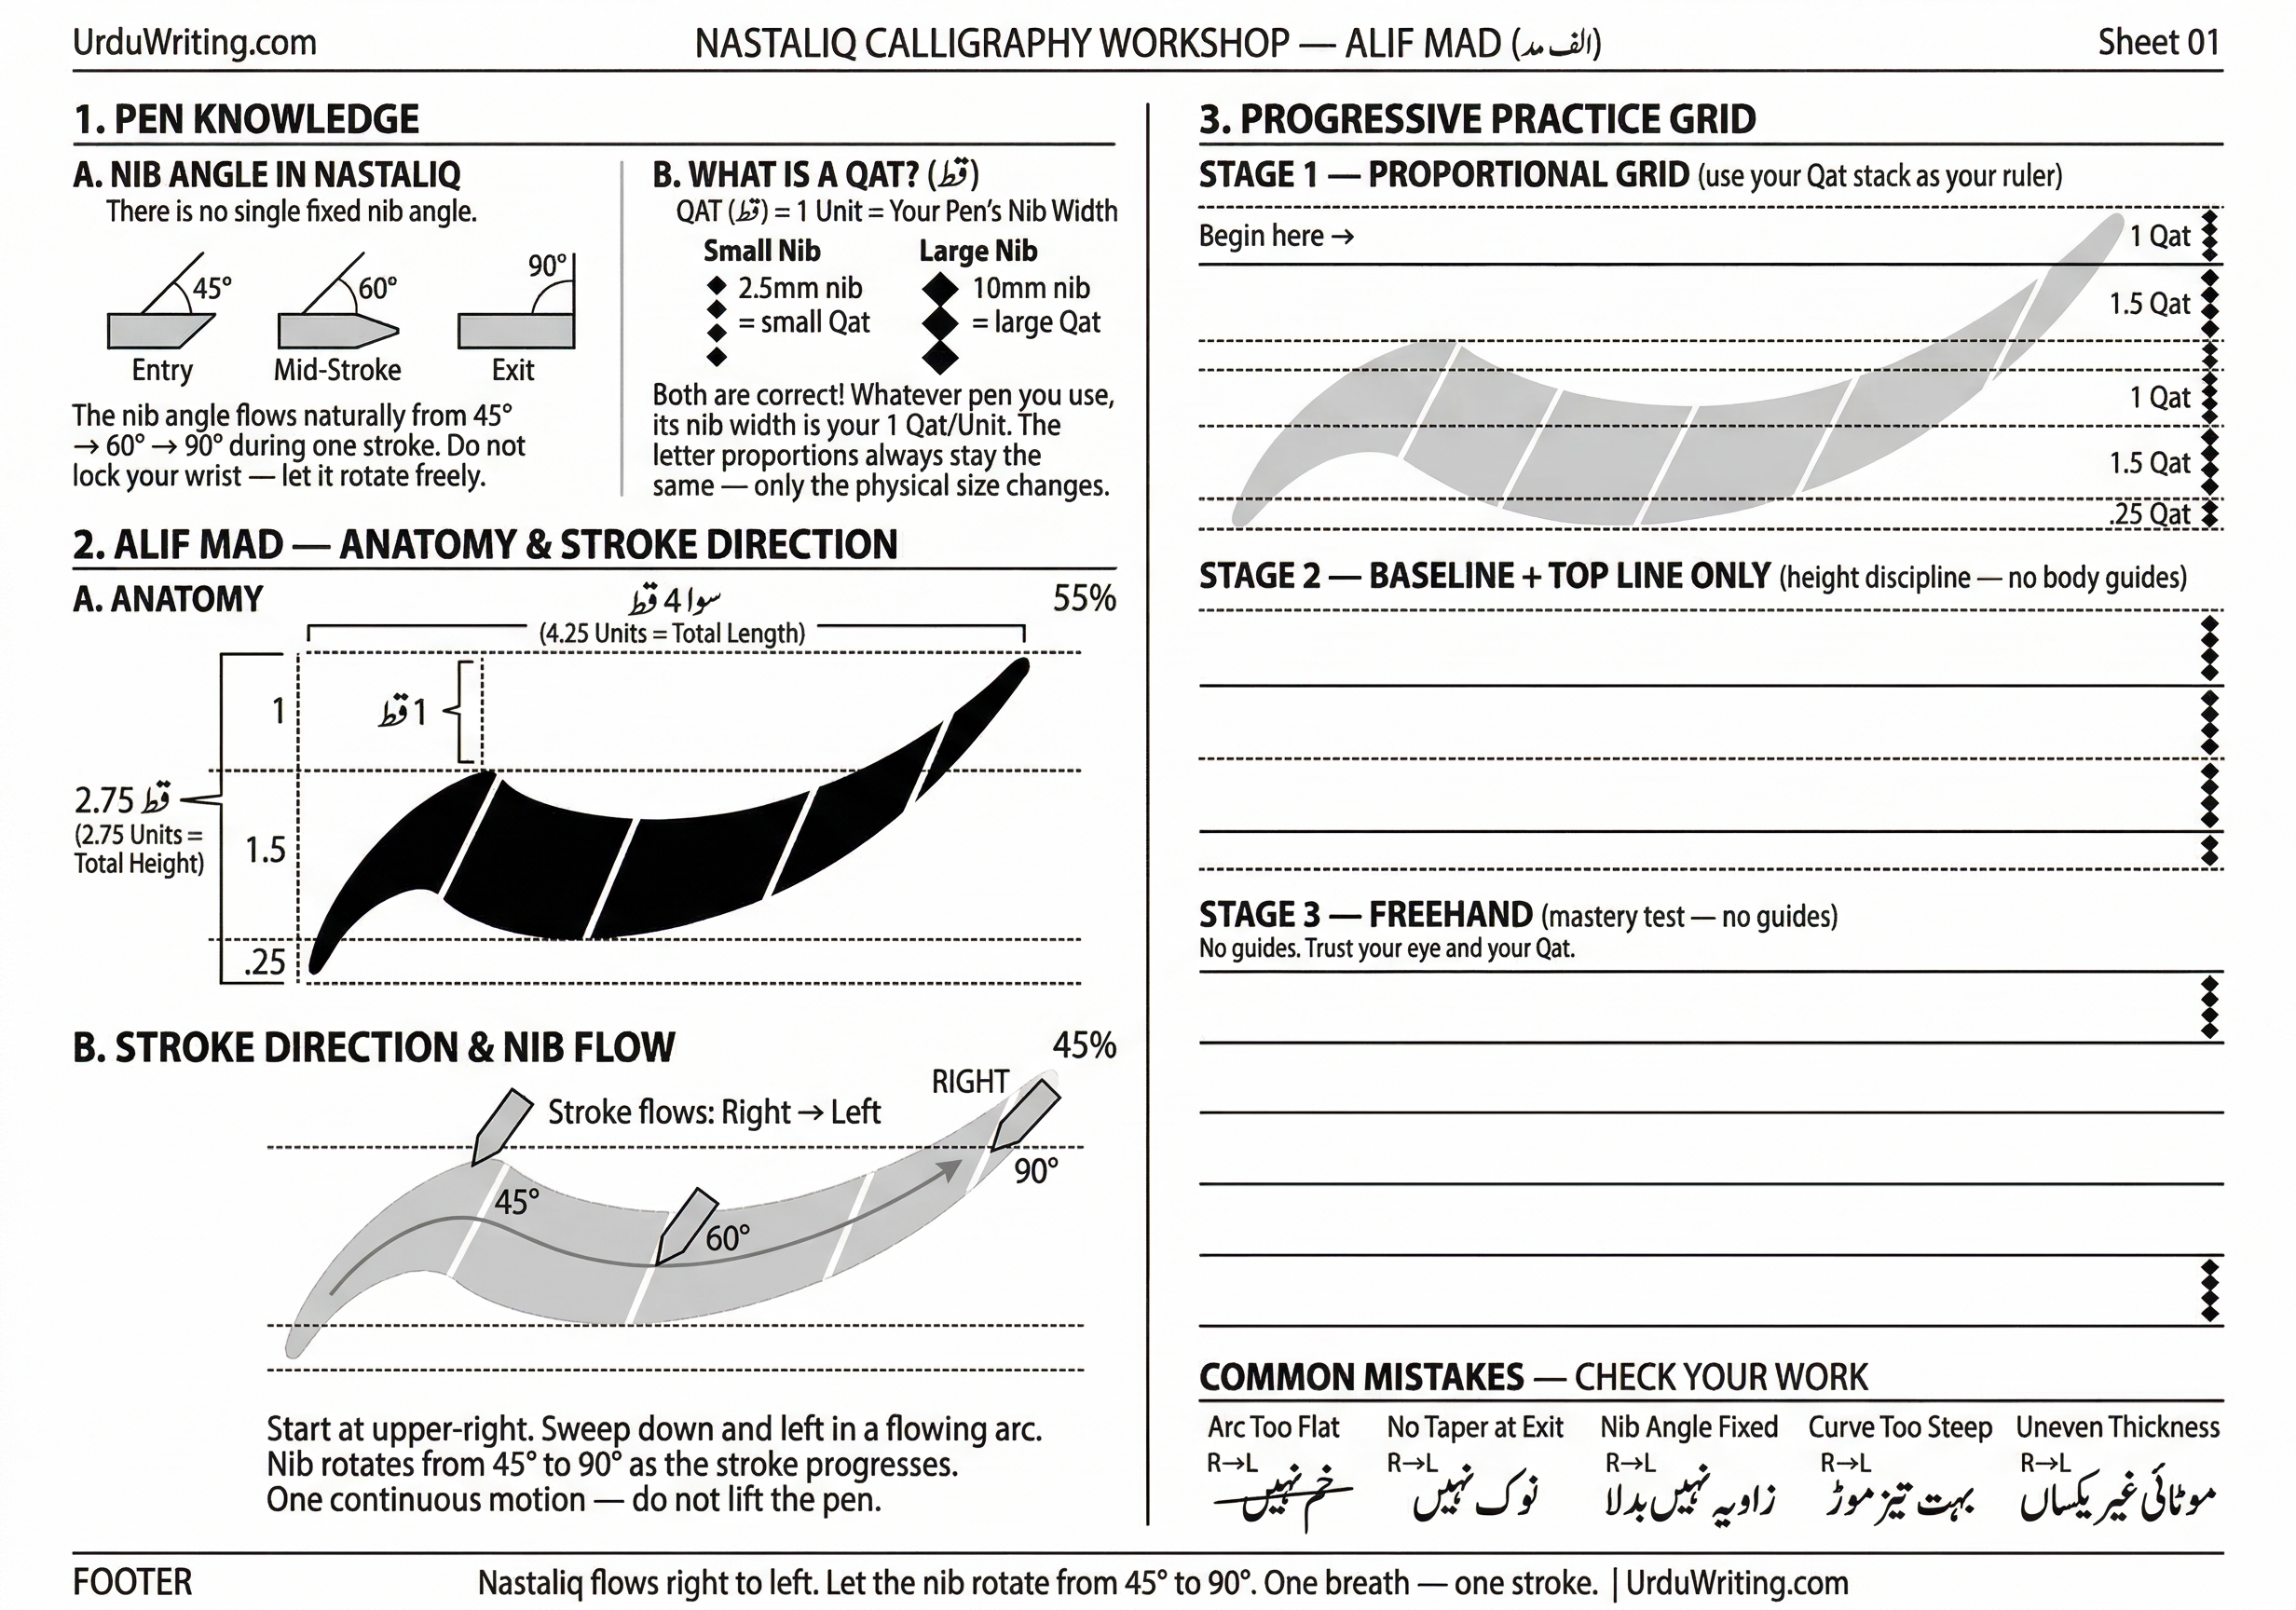
A letter like Alif Mad (الف مد) is not simply "tall." It is precisely 4.25 Qat units tall and 2.75 Qat units wide. These proportions hold true whether you are writing with a 2.5mm nib or a 10mm nib — scale up your pen, and your letters scale up perfectly. The Qat reference squares printed on each practice sheet let you verify your pen matches the grid before you begin.
Nib Angles — زاویہ کا راز
If the Qat is the "what" of Urdu calligraphy, nib angle is the "how." In most Latin calligraphy traditions, writers maintain a constant pen angle — typically 45°. Nastaliq is fundamentally different. A single stroke can require the nib to rotate through multiple angles, creating the characteristic variation in line weight that gives Nastaliq its breathtaking visual rhythm.
There is no single fixed nib angle in Nastaliq. The nib flows naturally through three positions in one continuous stroke — do not lock your wrist:
Alif Mad (الف مد) — Anatomy & Stroke Direction
Alif Mad is the ideal starting letter. It is a single stroke — simple enough for beginners, yet it encapsulates every fundamental principle of Nastaliq: the Qat system, dynamic nib angles, controlled curvature, and tapered terminals. Mastering Alif Mad is mastering the grammar of the entire script.
A. Anatomy — تناسب
Every measurement uses Qat units and represents the proportional standard maintained in Nastaliq workshops across South Asia for centuries:
| Measurement | Value | Description |
|---|---|---|
| Total Height | 4.25 Qat | سوا 4 قط — from baseline to tip |
| Total Width | 2.75 Qat | horizontal extension at widest point |
| Body Height | 1.5 Qat | main visible height above baseline |
| Below Baseline | 0.25 Qat | subtle descender below the line |
| Entry Width | 1 Qat | nib fully flat at 45° — broadest point |
B. Stroke Direction & Nib Flow
Start at upper-right. Sweep down and left in a flowing arc.
Nib rotates from 45° to 90° as the stroke progresses.
One continuous motion — do not lift the pen.
The stroke begins at roughly 45% of the total width from the right — this gives the letter its distinctive asymmetric sweep. The tip ends at a fine point no wider than 0.25 Qat. When you practice with these measurements you are not inventing a personal style; you are connecting to a living tradition of geometric excellence.
3-Stage Progressive Practice Grid — تین مرحلوں میں مشق
One of the most important decisions in designing Urdu handwriting practice sheets is how much scaffolding to provide. Too much, and students never develop independent handwriting. Too little, and beginners develop bad habits. Our sheets solve this through a structured 3-stage system that removes scaffolding gradually — the most effective method for motor skill development.
For children just starting out with the Urdu alphabet, combine this method with our free tracing worksheets — they provide the same progressive structure for younger learners.
Step-by-Step: Drawing Alif Mad — مرحلہ وار مشق
Follow these five steps using your printed Sheet 01. Read the full steps once before picking up your pen.
- A calligraphy pen with a flat nib — 2.5mm recommended for beginners, 5mm or 10mm for larger practice
- A printed copy of Sheet 01: Alif Mad Workshop (free download below)
- Black ink or a chisel-tip calligraphy marker
-
1Establish your Qat reference. Using the Qat markers printed in the top-right corner of Sheet 01, set your pen nib alongside the reference square to confirm the grid is correctly scaled for your pen. If the nib width matches the Qat square exactly, you are ready to begin.
-
2Position your pen for the entry stroke. Place the pen nib at the top guideline, angled at 45 degrees. This is a relatively shallow angle and will create a broad, wide entry to the stroke.
-
3Begin the downward arc. Apply consistent pressure and draw the nib downward and slightly to the right. As you move through the mid-section of the stroke, gradually rotate the nib toward 60 degrees. You should feel the stroke narrowing slightly — this is exactly correct.
-
4Complete the terminal. As you approach the baseline, continue rotating the nib to 90 degrees. The stroke should taper to a clean, fine point. Do not lift the pen abruptly — allow the rotation itself to create the taper naturally.
-
5Evaluate your work. Look at your completed Alif Mad against the anatomy diagram on the sheet. Does it reach the full 4.25 Qat height? Is the arc single and smooth, or does it have multiple bends? Is the terminal a true point, or does it end with a flat, blunt base? Check the common mistakes panel before starting your next attempt.
Repeat this process through all three stages of the practice grid on the sheet before moving on to the next letter.
Nastaliq Workshop Sheets — Preview
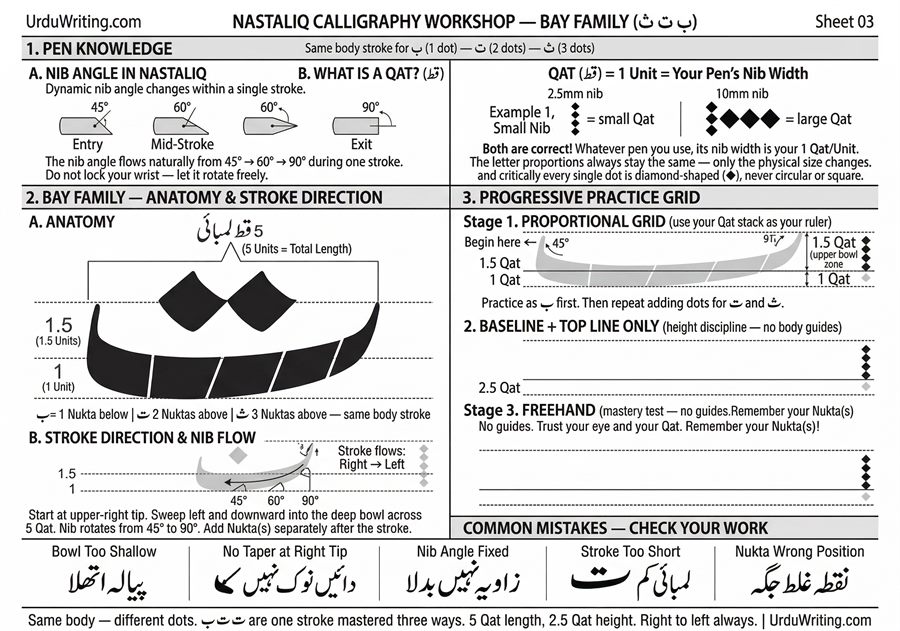
Sheet 01 (Alif Mad) and the Kasheeda Bay sheet are completely free — no signup needed. The full 38-letter series is available on Gumroad.

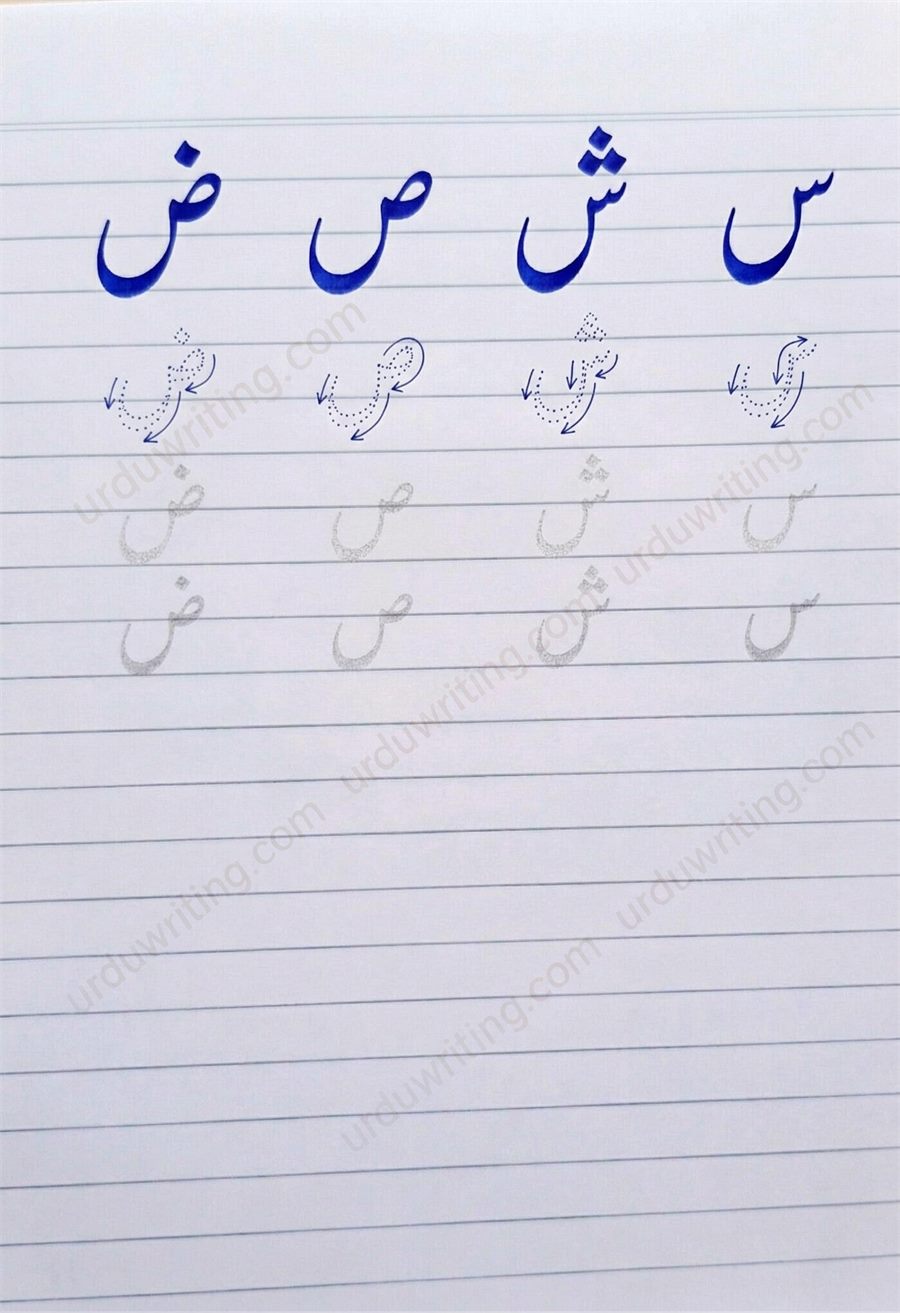
A separate bonus practice guide — traditional lined Urdu handwriting sheets with stroke direction arrows and tracing rows. Bonus Sheet 1 is free as a lead magnet. The complete Haroof-e-Tahajji guide (all 38 letters) is included with the full Gumroad series.
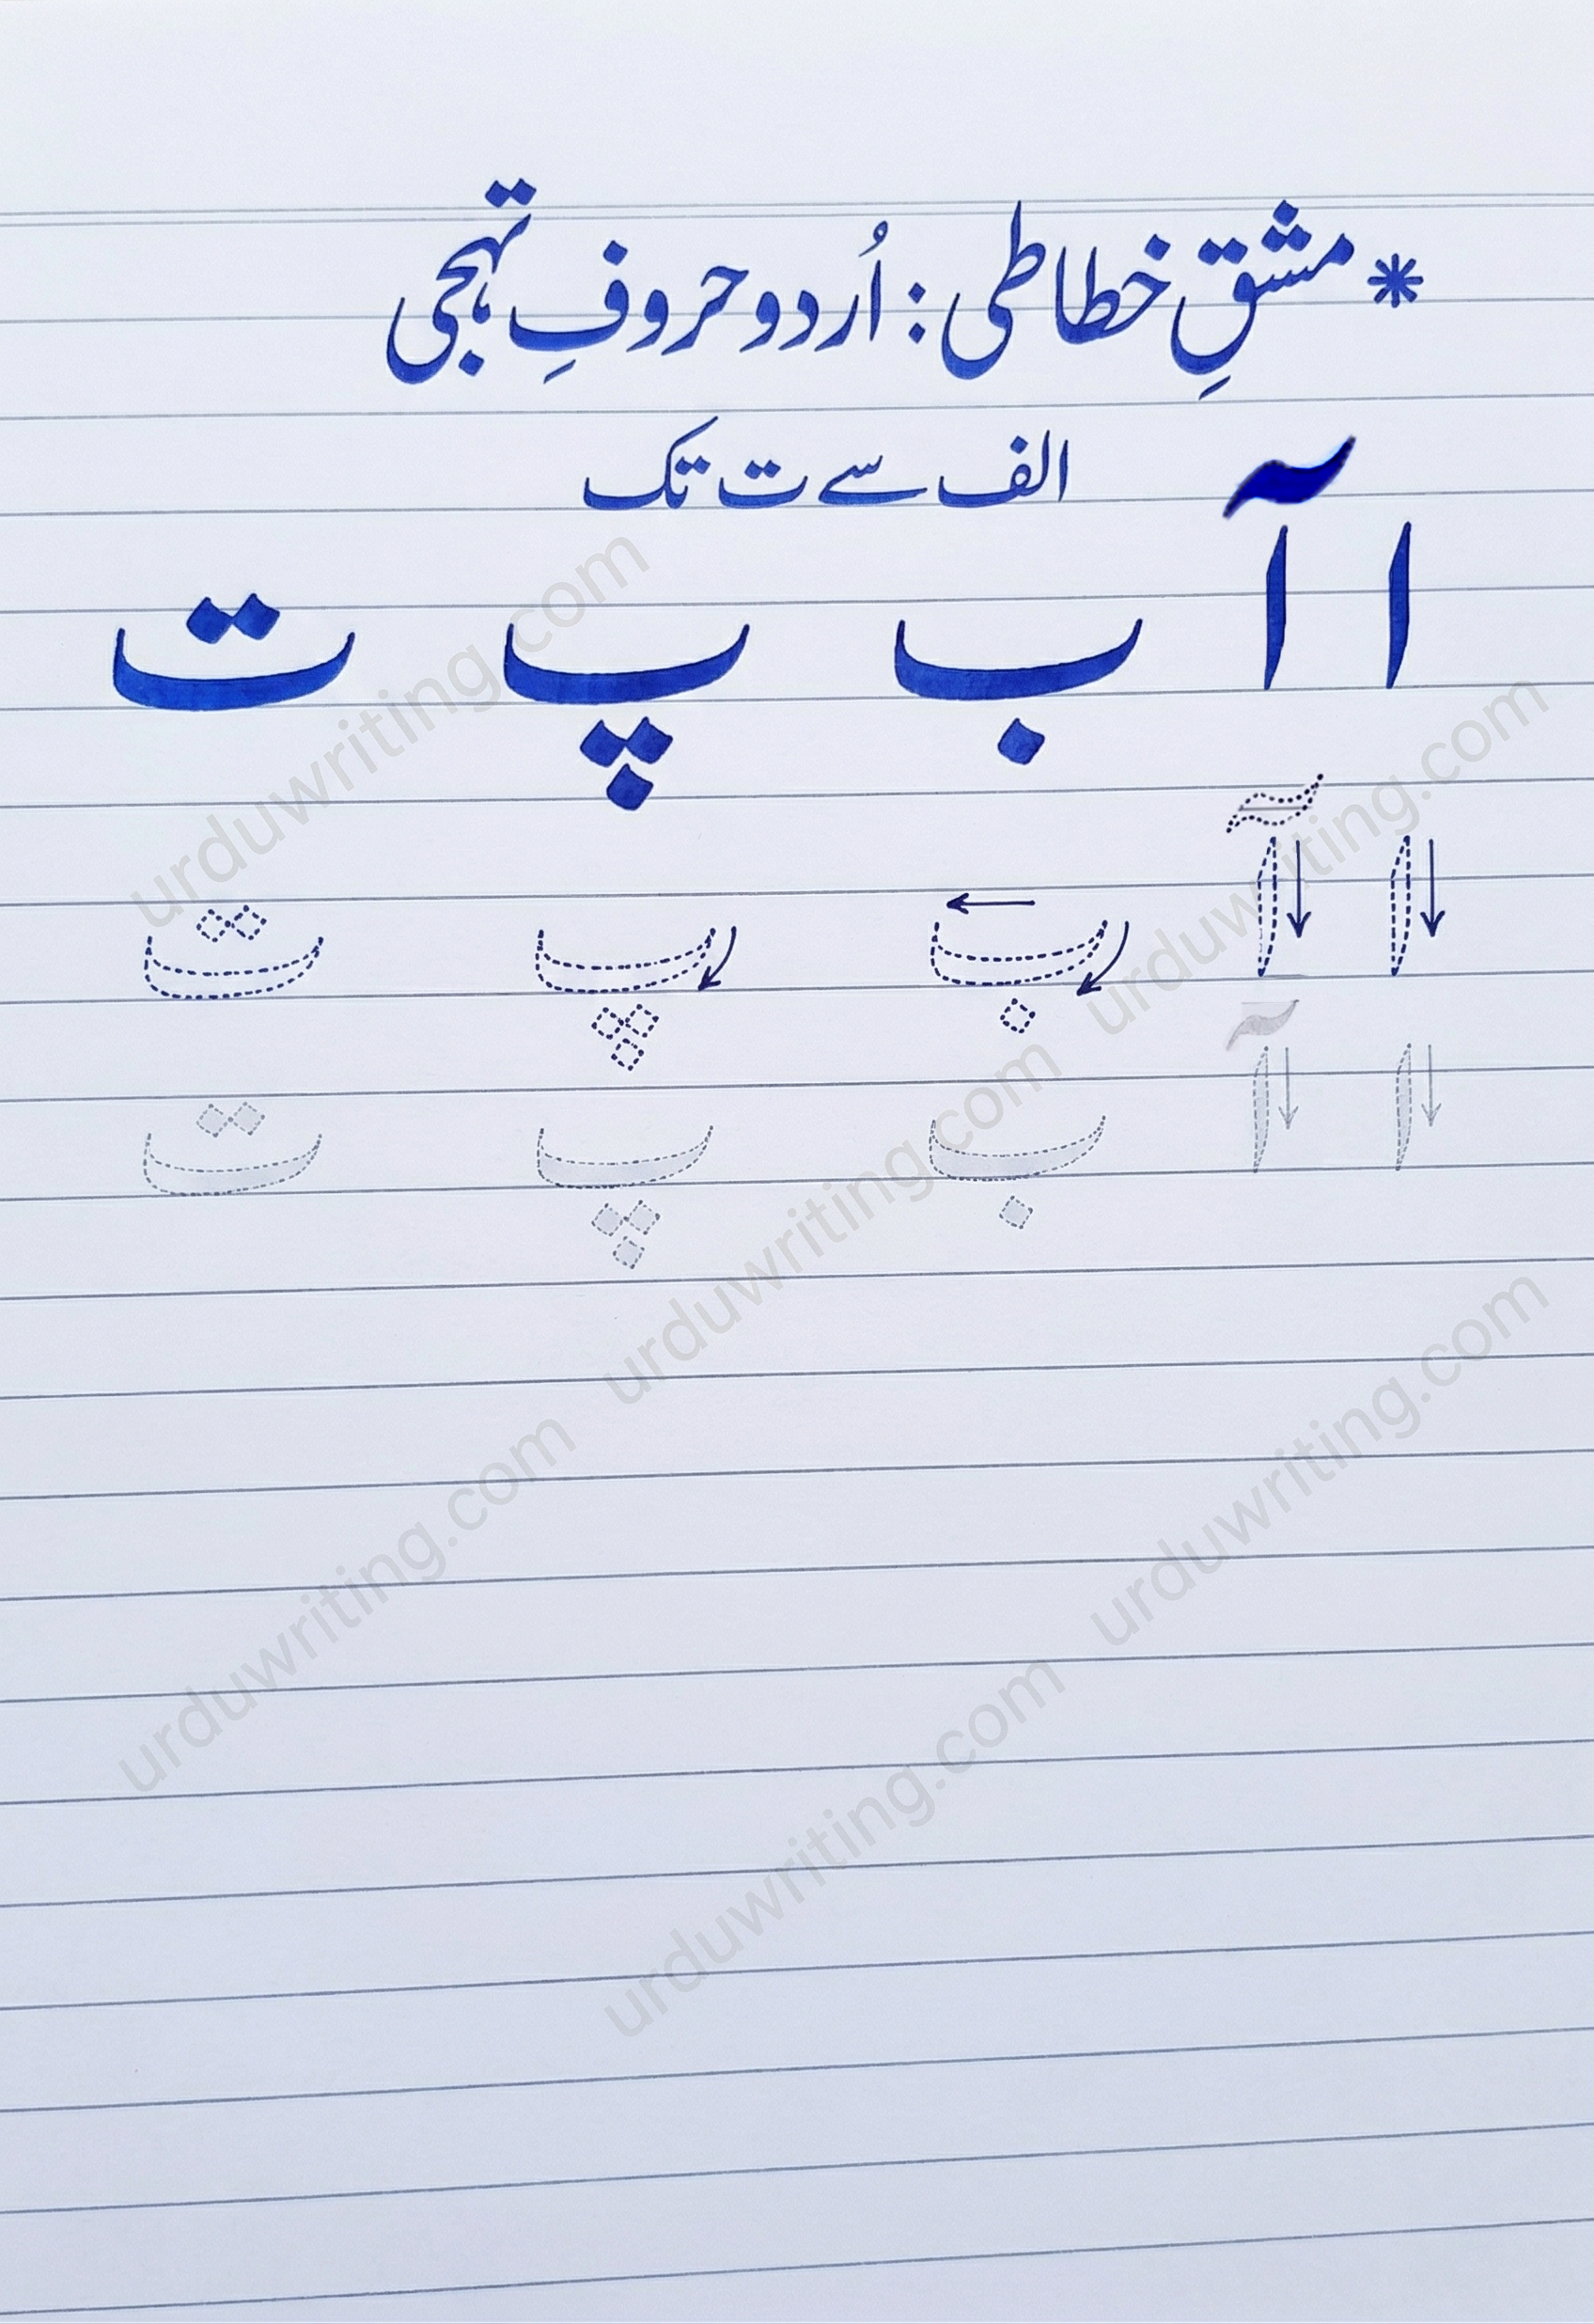
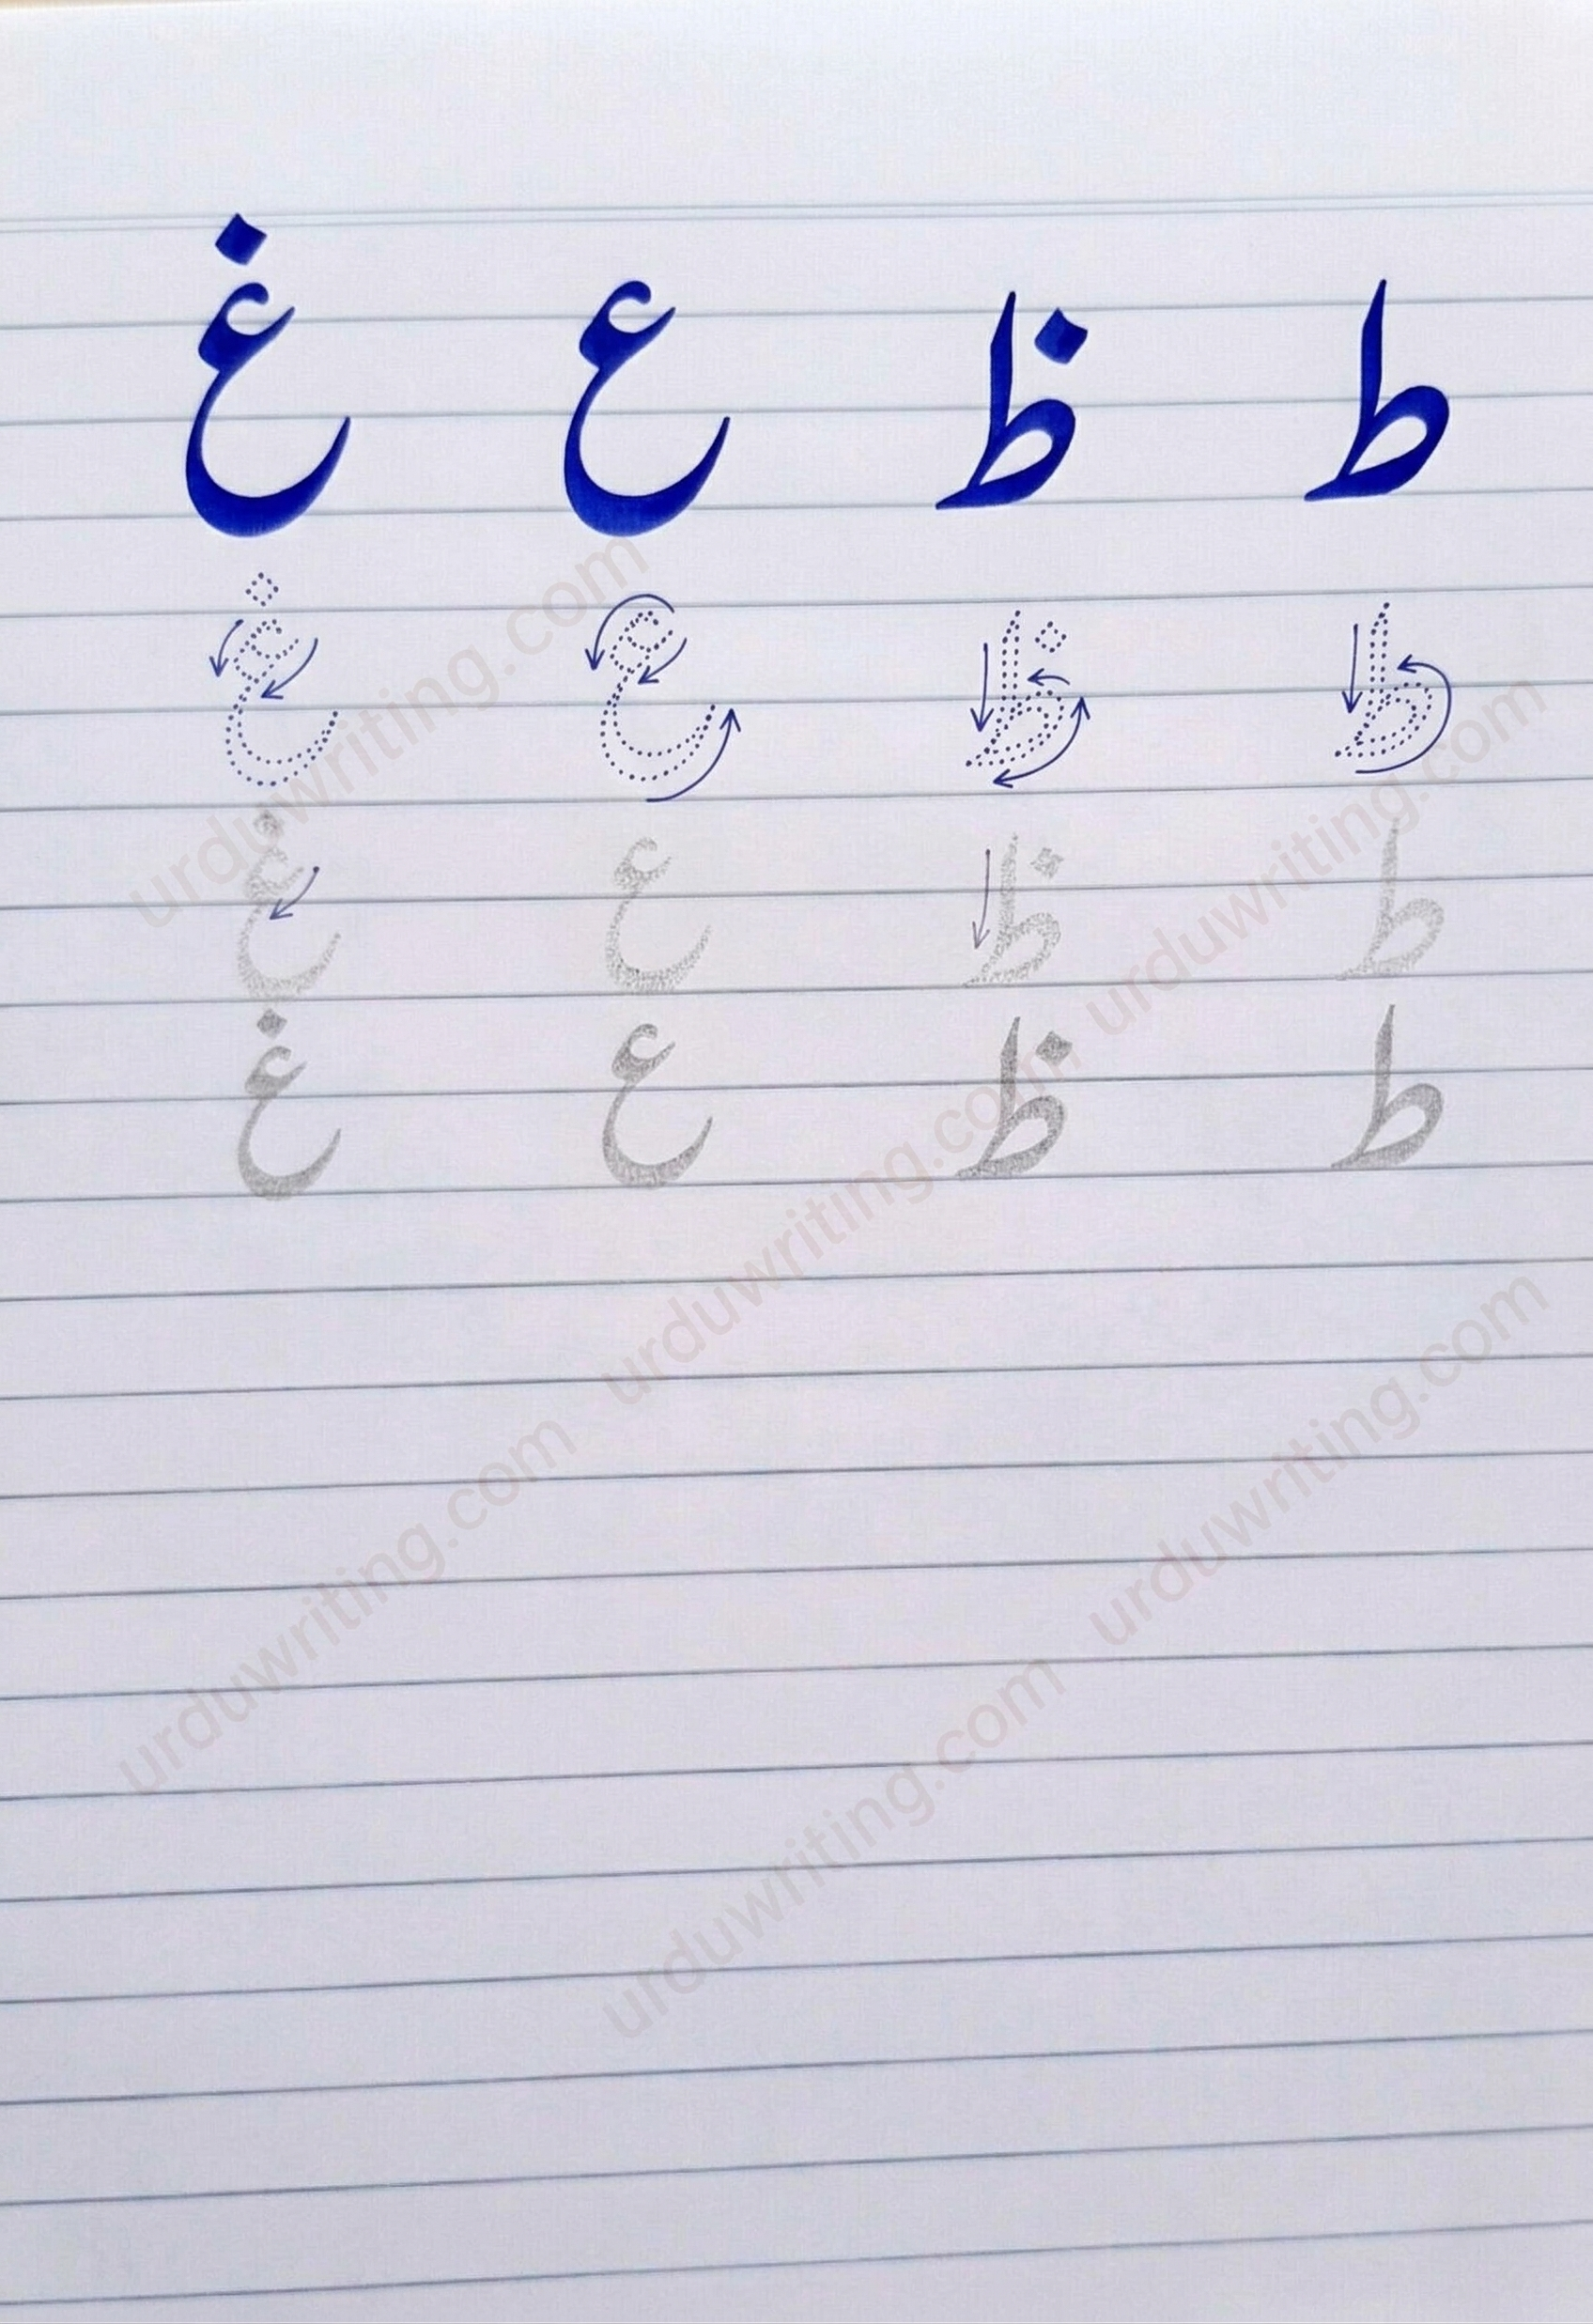
Bonus Sheet 1 is free to download. The complete Haroof-e-Tahajji practice guide is included when you purchase the full 38-letter Nastaliq Workshop Series on Gumroad.
Common Mistakes — غلطیاں اور اصلاح
These five errors appear on Sheet 01's reference panel. Identifying and naming your errors is itself a sign of developing skill. Learn to recognise them in your own work before moving to Stage 2.
✍️ Full 38-Letter Nastaliq Workshop Series
Sheet 01 is a free preview of the complete professional workshop series. The full set covers all 38 Urdu letters — each with the same technical anatomy diagrams, Qat grids, 3-stage practice system, and common mistakes panel that you see in Sheet 01.
- All 38 Urdu letters — complete Haroof-e-Tahajji
- 3-stage practice grid for every letter
- Technical anatomy diagrams with Qat measurements
- Nib angle guides for every stroke
- Common mistakes reference on each sheet
- A4 landscape, print-ready PDF format
- Works with any pen nib size (2.5mm–10mm)
- Instant digital download via Gumroad
The "Learn Urdu: Qaida for Kids" Companion App
The physical practice sheets in this series are designed to work in direct harmony with the "Learn Urdu: Qaida for Kids" Android app — a digital companion that brings the same structured, proportional approach to Urdu learning on screen.
Where the physical sheets develop fine motor skills, proper pen grip, and the tactile muscle memory that only real writing can build, the app provides interactive letter tracing, audio pronunciation guides, and gamified reinforcement that keeps young learners engaged. Together they form a complete Urdu learning system: physical practice for deep skill development, digital reinforcement for vocabulary and recognition.
Learn Urdu: Qaida for Kids
Particularly recommended for children aged 4–10 working through the Urdu Qaida for the first time, classroom teachers who need a digital supplement to physical worksheet practice, and parents looking for a technically accurate Urdu learning solution. Use it alongside Sheet 01 to reinforce the Alif Mad letter in both written and digital form.
📲 Learn More About the AppFor older learners and adults, our free online Nastaliq writer and Urdu typing guide complement the handwriting series — handwriting builds deep letter knowledge, and typing lets you apply that knowledge at speed.
🖥️ Free Urdu Tools — Right in Your Browser
Apply your handwriting knowledge digitally. Write, convert, and compose in Urdu with no software to install.
FAQ — عام سوالات
Conclusion: Your Journey to Beautiful Urdu Handwriting
Mastering Urdu handwriting in the Nastaliq tradition is one of the most rewarding intellectual and artistic journeys a person can undertake. It is a skill that connects you to a thousand-year tradition of scholarship, poetry, and cultural expression — and in an age when almost everything is typed, it is also a skill that genuinely sets you apart.
Download Sheet 01: Alif Mad Workshop below, spend twenty minutes a day for two weeks, and return to this guide. You will be astonished at what your hand can learn to do.
When you are ready to go further, the full workshop series on Gumroad is waiting — all 38 letters, Jor Tor exercises, word building, and sentence practice in Nastaliq handwriting.
شروع کریں — Begin Today
Start with the free sheets above, then get the full workshop — letters, Jor Tor, words & sentences — on Gumroad.